Enhance your document management process and streamline PDF editing within Salesforce
For medium-to-large businesses, integrating Salesforce with PDF editing software is crucial for improving document processes. The ability to edit PDFs directly within CRM records cuts down on time wasted switching between platforms, while keeping documents fully synced with customer data—streamlining operations and improving accuracy.
A 2022 internal pdfFiller report found that 27% of business users were actively searching for a PDF editor that integrates with Salesforce. Given Salesforce’s status as the top CRM for companies of all sizes, this demand makes perfect sense.
In this blog, we’ll explore the airSlate PDF Editor for Salesforce and dive into how businesses across various industries are reaping the benefits. Let’s dive in!
Why airSlate PDF Editor is a smart choice for businesses using Salesforce
The airSlate PDF Editor is designed to accelerate your document workflows by bringing powerful editing tools directly into your Salesforce CRM. Say goodbye to juggling multiple tabs—now you can quickly make last-minute changes, update documents, and ensure all versions remain in sync, all without leaving Salesforce.
Whether you need to edit text, add and complete fillable fields (including signature fields), adjust images, highlight or redact sensitive information, merge files, reorganize pages, or add watermarks, airSlate makes it possible to do everything online with ease.
Key benefits of airSlate PDF editor for Salesforce
- Significant time savings: Edit PDFs directly in Salesforce without switching between platforms, streamlining document edits and keeping all versions updated in real time.
- Flexible, customer-oriented pricing: Scalable pricing based on usage, with no minimum user requirements.
- Scalable Salesforce workflows: Easily add eSignatures, document generation, and automation as your CRM needs grow.
Common use cases for the airSlate PDF Editor in document management include redacting sensitive information in legal and HR documents, making last-minute adjustments to contracts, reports, and business proposals, and adding watermarks to protect copyrights on creative works, designs, or promotional materials.
How to install the airSlate PDF Editor application to your Salesforce organization
- Install airSlate PDF Editor from AppExchange. Select the package that suits your needs and click Install.

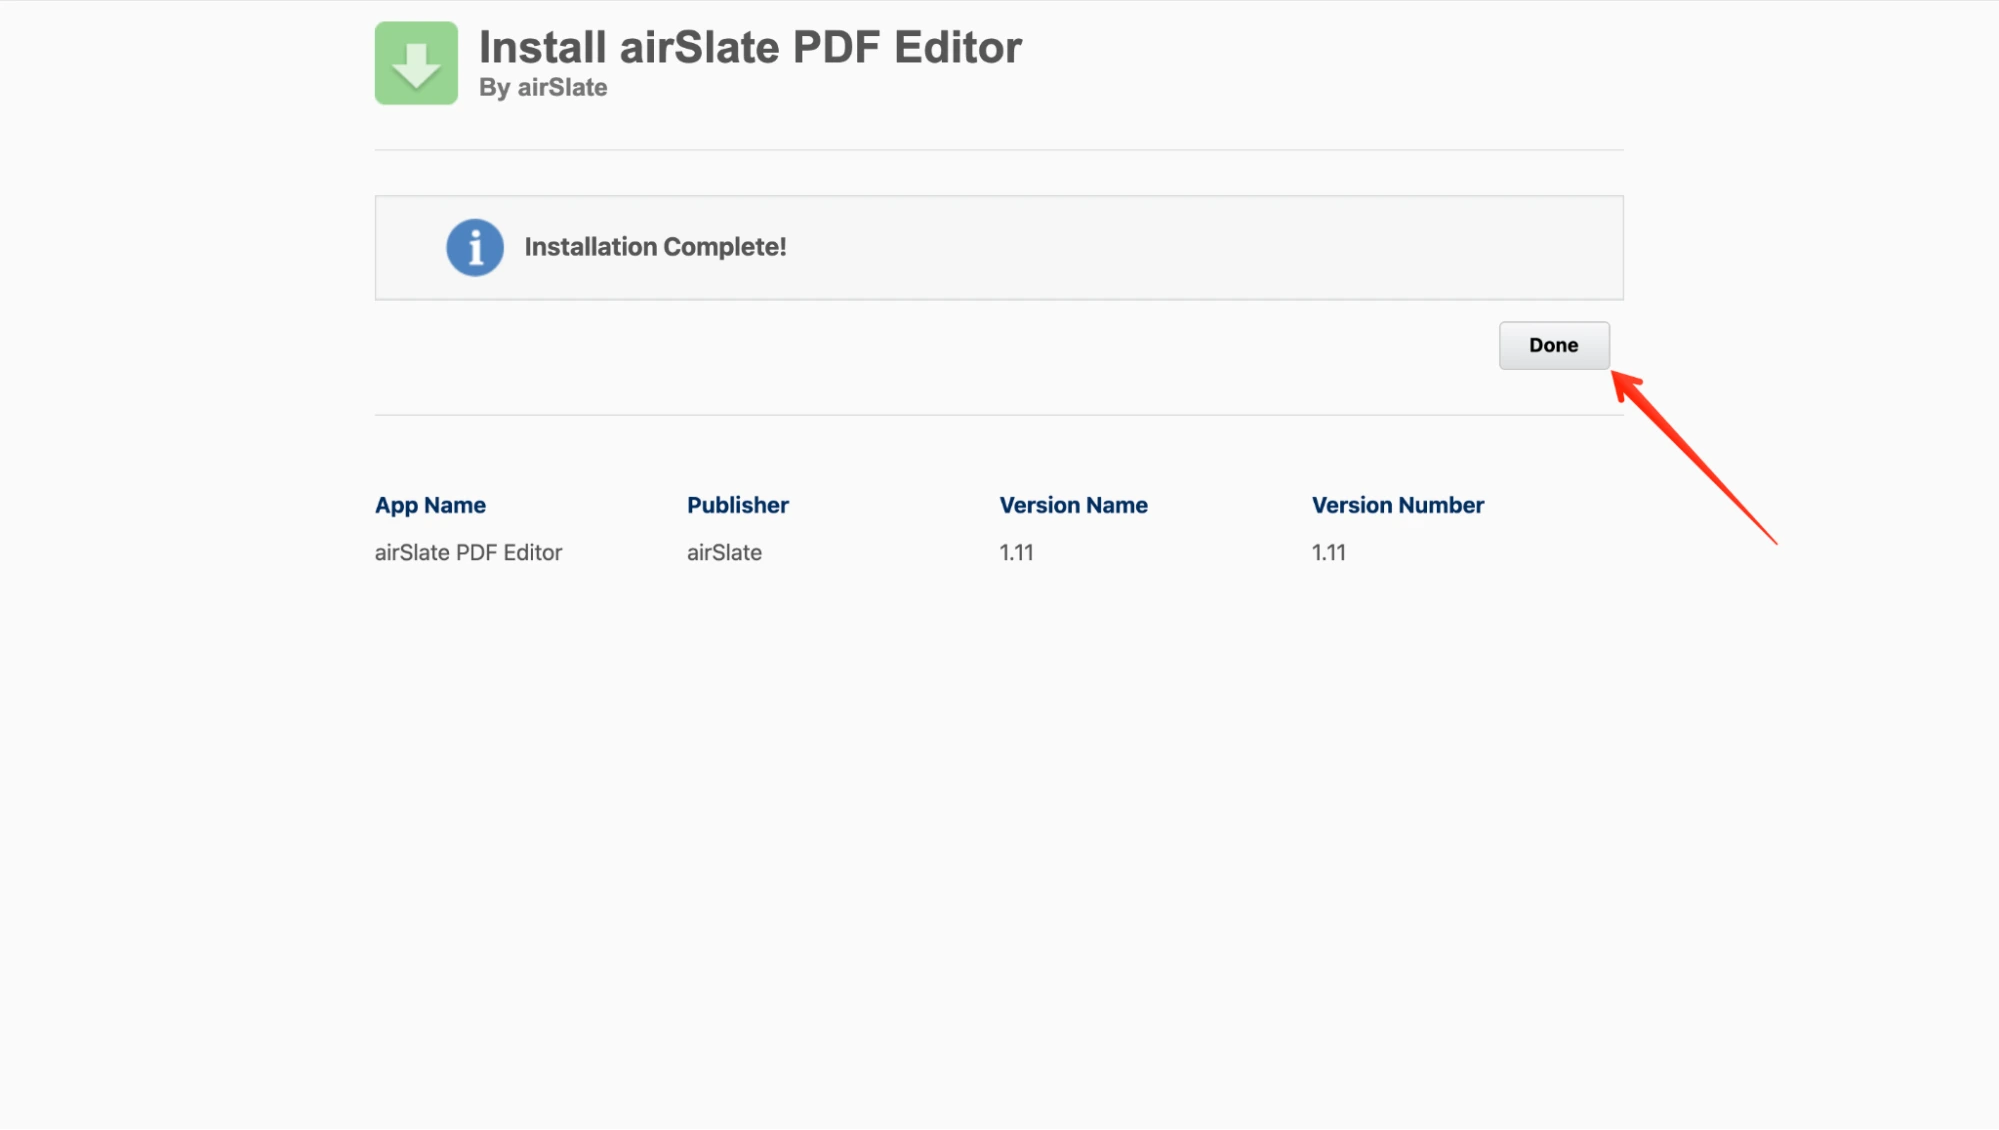
2. Once the installation is complete, you’ll be redirected to a notification page. Click Done to proceed.
How to test airSlate PDF Editor integration for Salesforce
- After installation, you’ll be redirected to the configuration page. If not, you can manually access it by navigating to Setup > Apps > Packaging > Installed Packages. From the list, select airSlate PDF Editor and click Configure
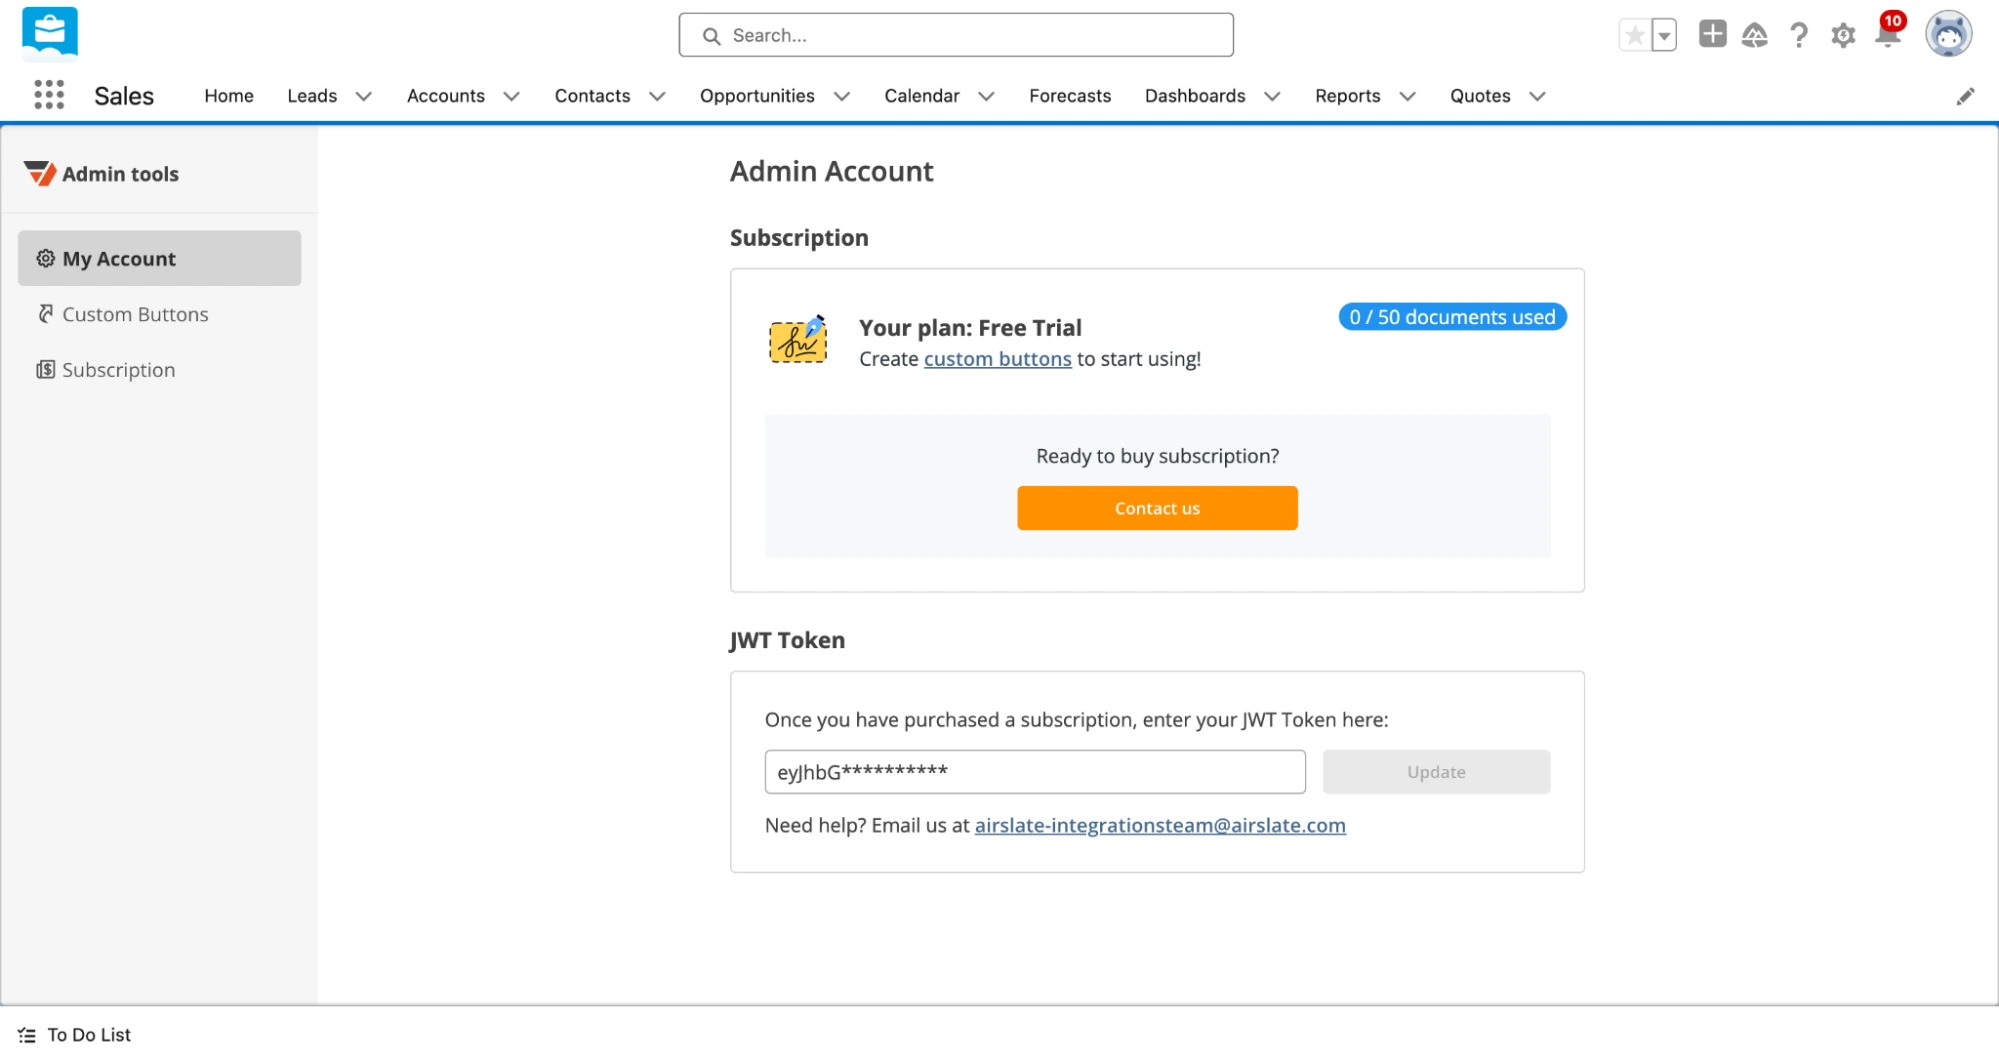
- If this is your first time installing airSlate PDF Editor, grant the necessary access permissions. You’ll then be redirected to the Admin tools, where your free trial will automatically begin.
- Your free trial will start automatically, and you’ll receive 50 free documents for testing, and the My Account tab will display how many are remaining. No JWT token is required during the trial.
Now, you’re ready to explore how the airSlate PDF Editor works within Salesforce.
- In Admin Tools, navigate to the Custom Buttons tab to configure the airSlate PDF Editor link parameters. Start by choosing how you want to save the edited PDF files; for this example, we will create new versions of the edited document.

In Step 3, indicate the type of object for which you will create custom buttons. After that, copy the generated URL by clicking Copy URL.

2. In your Salesforce account, navigate to Setup > Object Manager. Choose the object type for which you want to create a custom button; in this case, it’s Account. Then, go to Buttons, Links, and Actions, and click on New Button or Link.

3. Name your button and set the Display Type to Detail Page Button. In the empty field, paste the URL you copied in Admin tools. Customize other settings if necessary and click Save when finished.

4. Now, you have to add the new custom button to the account layout. Go to Page Layouts and select Account Layout.

5. Go to the Buttons tab, find your newly created button, and drag it to Custom Buttons and Salesforce Mobile and Lightning Experience Action in the account layout. Click Save to confirm your changes.
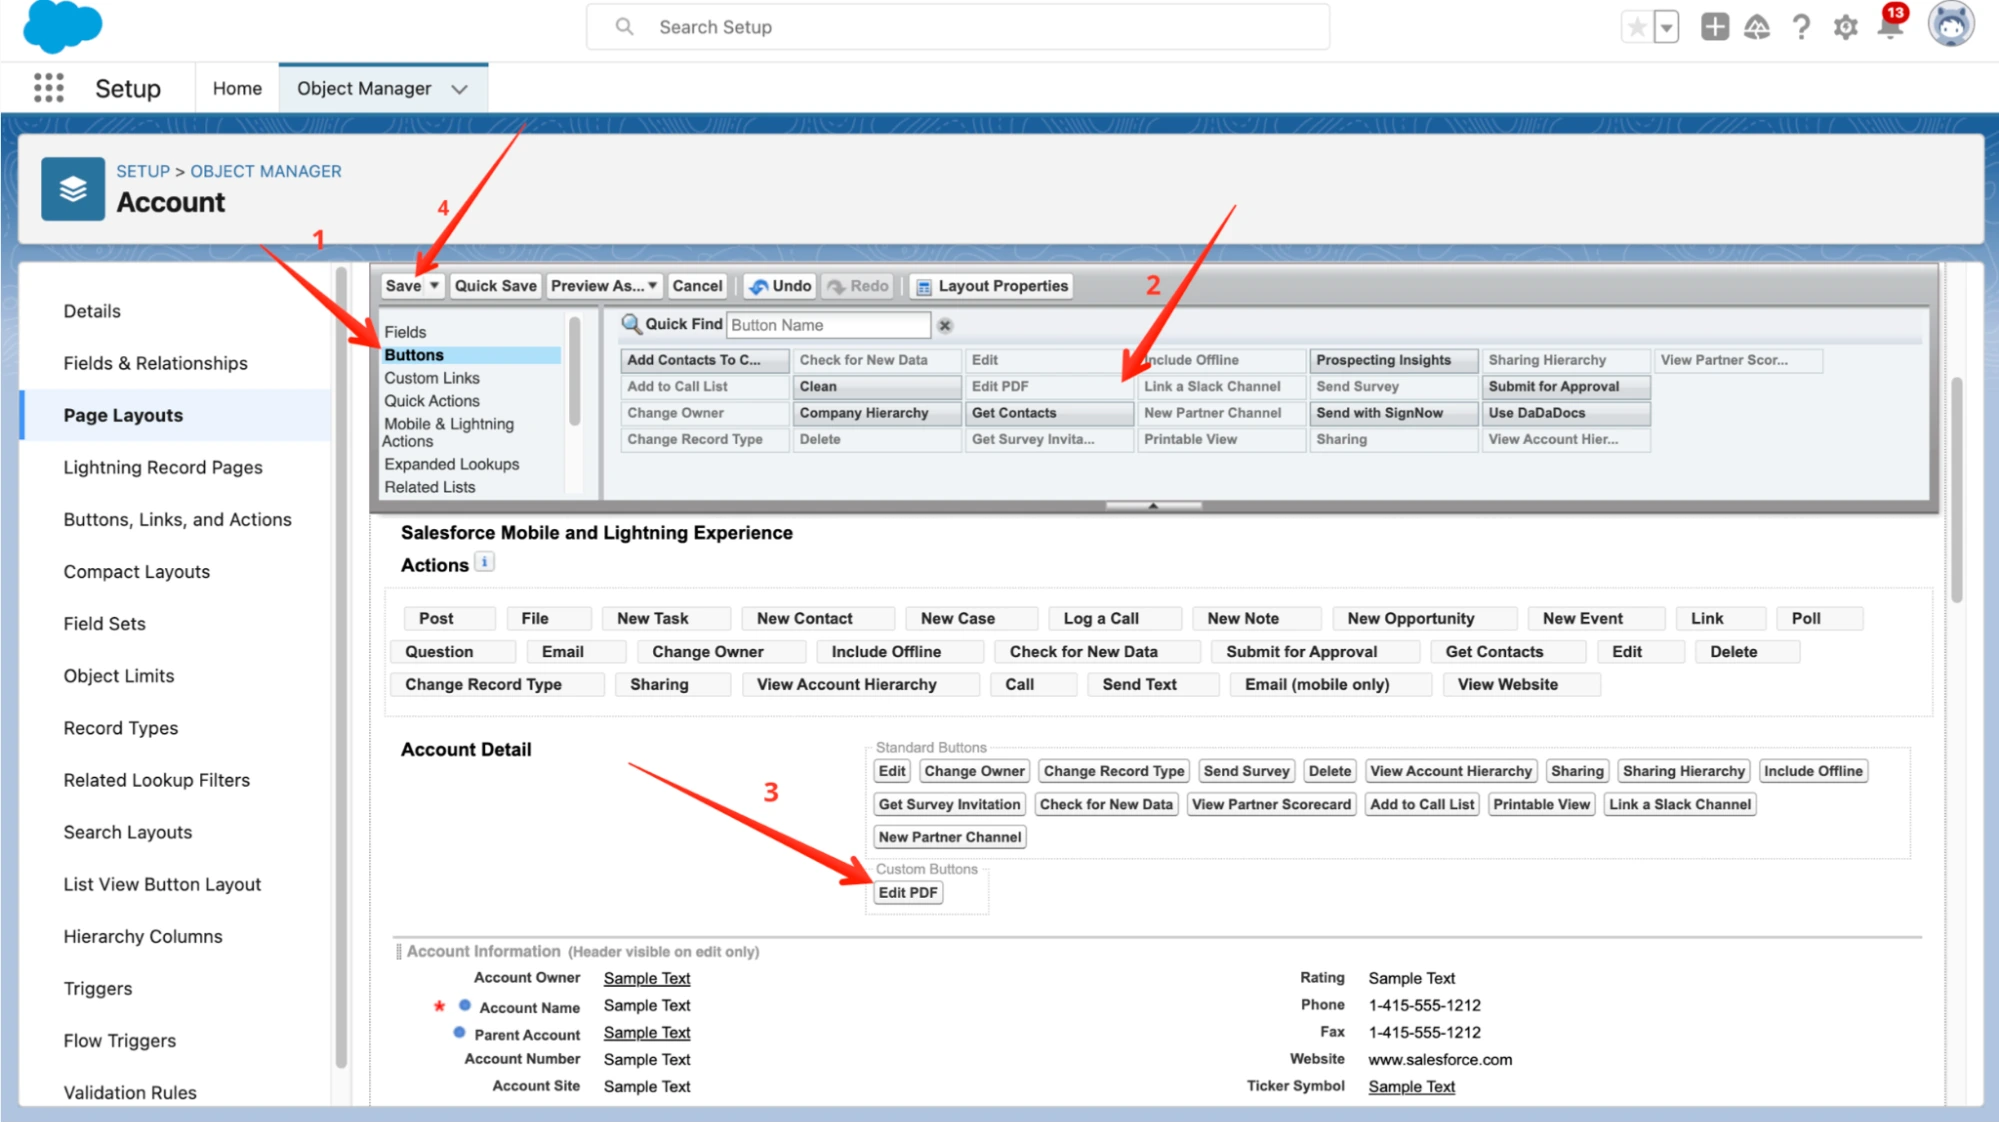
The button is now ready for use.
Start using airSlate PDF Editor for Salesforce
1. Open any Account and select the newly created button from the dropdown menu.

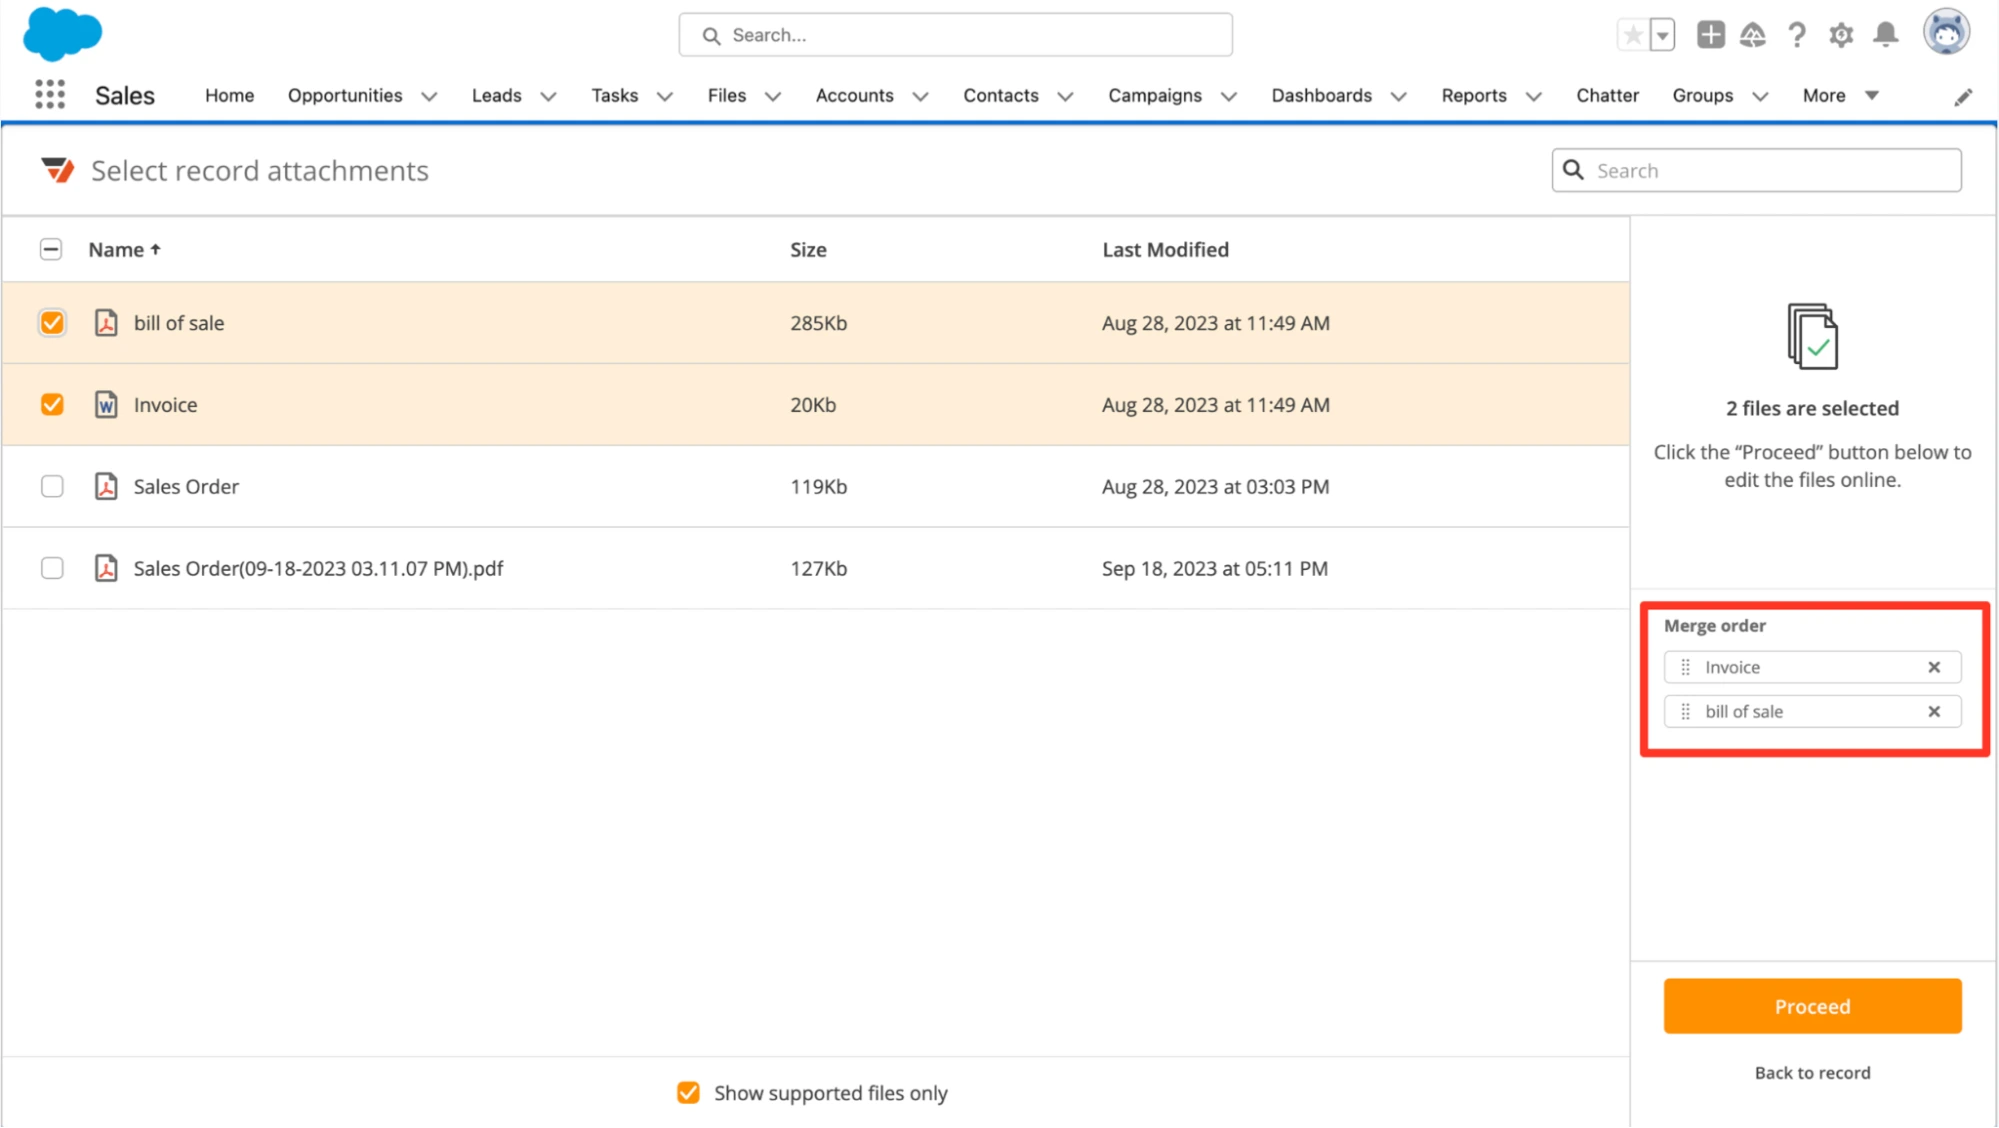
2. You will be redirected to the list of documents attached to your current record. Check the box Show supported files only to display documents you can edit in airSlate PDF Editor. Then, select a document and click Proceed.

3. In the editor, add text to your document, fillable fields, graphic elements, and many more. If you have fillable forms attached to your record, they’ll be activated in the editor, and you’ll be able to fill them out. Once you’ve finished editing, click Done.

Since in the settings we’ve selected to create a new document version every time the document has been updated, you can see a new file in the list. If you select to override the existing file, the latest version will replace the previous one, and the number of documents won’t change. By default, every document version gets a name containing its update date and time.

4. If you select several files in the list, you’ll be able to merge them. To do this, set the order in which the files will appear and click Proceed. The files will open in the editor as a single document, which you’ll be able to edit as described above.
Once you’ve finished your free trial and ready to upgrade your plan, go to airSlate PDF Editor Admin tools. In the Subscription tab, click Upgrade to complete the upgrade form and contact the airSlate Sales Team. After purchasing the subscription, follow the guidelines to generate a JWT token for your Salesforce organization.
Try airSlate’s Salesforce PDF generator today to elevate your document management process
The airSlate PDF Editor for Salesforce enhances document management by integrating powerful editing tools directly into your CRM platform. This seamless experience allows for real-time updates, customizable buttons, and efficient workflows without the need to switch platforms.
With features like redaction, last-minute modifications, and copyright protection, airSlate’s Salesforce PDF generator is essential for maintaining document integrity across legal, HR, and creative sectors.
If you’re looking for advanced e-signature solutions or workflow automation, be sure to check out SignNow and WorkFlow on AppExchange for more powerful tools to enhance your operations. Don’t miss out on streamlining your processes—try the airSlate PDF Editor today and see how it can transform your document management.
- Why airSlate PDF Editor is a smart choice for businesses using Salesforce
- How to install the airSlate PDF Editor application to your Salesforce organization
- How to test airSlate PDF Editor integration for Salesforce
- How to create a custom button for your object type
- Start using airSlate PDF Editor for Salesforce
- Try airSlate’s Salesforce PDF generator today to elevate your document management process
